On-chain or Lightning
This article is for people who don’t want to buy a Raspberry Pi and have an old Windows computer they can use to run a Bitcoin Node.
Windows is not Bitcoin-friendly. It is trashy 3rd party software with very little flexibility. It is not consistent with the Bitcoin “ethos” of “don’t trust, verify”. A lot of Bitcoin software is not written in Windows, as developers shun Windows.
No problem. If you want to use Windows, there is a solution.
You can download virtualisation software on your Windows computer, and then install a Linux distribution operating system on that, Run Linux from your Windows computer, and install all the Bitcoin software you need on Linux. This article will show you how.
It will still require a bit of hard drive space, so an external SSD is likely to be needed.
I recommend getting a high-quality one like this
You don’t want a low-quality drive; they fail, and you are left re-downloading the blockchain. You also don’t want a regular external hard drive; they are very slow for this indication, and they are more likely to fail. Get an SSD.
If you do decide to buy a Raspberry Pi 4 to run a node, you’ll still need an external SSD drive.
Most people think you need to leave your Bitcoin Node running 24 hours a day. This is not the case. If you leave it running, you are helping the network in a small way, but you are also keeping your version of the blockchain up to date at all times, making any balance checking you do quick and easy. You could switch off the computer from time to time. Nothing bad will happen. But when you do want to know your bitcoin balance, say after receiving a transaction, you will have to turn the machine on and wait for it to synchronise. If you’ve left the computer off for a couple of weeks, it could take an hour or more. This trade-off may be acceptable to you.
Learn a little bit of Linux command line (just the very basics)
This article will guide you with some command-line. I promise it will be easy if you follow the instructions, but I do expect you to know how to navigate around the file system in Linux. If you don’t, then watch this 11-minute video to learn some SSS (super simple stuff). If it’s mildly interesting, watch this one as well, it’s a bit longer.
Download and Install Virtual Box (free)
Go to virtualbox.org and download from the “Windows hosts” link…

Then, we will check the digital signature. Maybe it’s not crucial for this software, but it’s a good habit, and here’s a chance to show you how to do it easily. Click the SHA256 checksums link.

You’ll get this output. The Windows one is the only relevant one for us, the “….Win.exe” file.

Next, open the command prompt.

Navigate to your downloads folder using the “cd” command. You can see what’s in a directory with “dir”. You can see what directory you are in, printed before the “>” character. You can navigate up the tree with “cd ..”
When you are in your downloads folder, you should see the newly-downloaded file with the “dir” command. If there are hundreds of files there, clean it up and delete some, you grub.

Next, type the text below as shown. There is the certutil program, the “-hashfile” option, the file name (if you start typing the file name, and press <tab> windows will autocomplete for you if it’s unambiguous.) then “SHA256”, then <enter>.

This is the output you’ll get. Check that it is an identical hash to the one that is published.

Next, run the executable file to install VirtualBox.

Download Linux Mint
Go to Linuxmint.com, and select “Download” near the top

Scroll down to here. I will choose the “cinnamon” flavoured desktop.
Choose a mirror (A server that will deliver the software to you via the internet)

Click on one of the mirror links. My Windows installation (Windows 10) decided to block the download. I ignored that and clicked “keep” for the download to continue. A 1.8 Gigabyte file.
Next, we verify the download fingerprint.


Save BOTH files to your Downloads folder. IF YOU FORGET TO SAVE THE SECOND FILE THE INSTRUCTIONS FURTHER DOWN WILL FAIL. PAY ATTENTION TO DETAIL.

Follow the instructions here, the instructions on the web page are longer and convoluted for no reason. If this doesn’t work, revert to the instructions on the webpage.
Next, open the command prompt. Change directory to Downloads. Type the command as shown (when typing the long file name, just type the first few letters and hit <tab> and Windows will autocomplete if it is unambiguous.) Compare the hash is identical to the published has on the website.

Go back to the web page, and select “copy this command to the clipboard”, then run it in the command line by pasting and hitting <enter>.

Then copy and paste this command into the command line. Be in the “Downloads” folder. Don’t worry about the other commands, because we did not create an “ISO” folder.

This is the output to expect.

The words “There is no indication that the signature belongs to the owner.” is expected and normal. Relax. What we want to see is “Good signature from…” Success!
We are done here. Close the browser and command line.
Run VirtualBox and create a Virtual Machine
Open VirtualBox, and click “New”, and name your new “computer”. I called mine “Bitcoin Node”. Then change the “Type” to “Linux”, and for “Version” select “Ubuntu 64-bit”, or “32 bit” depending on your computer, and click “Next”

I would select hardware resources similar to a Raspberry Pi 4 because I know that will be enough.

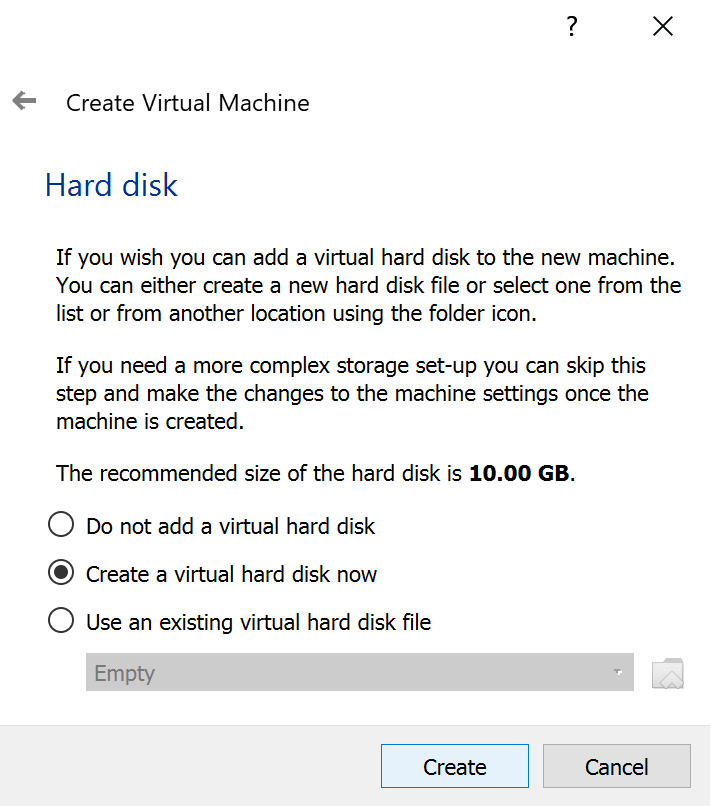


10 Gb is plenty… or so I thought! It was the recommended amount. Then during installation, I was informed 12Gb was the minimum Linux Mint needed. I had to start again. This time 14Gb.

You’ll see the optical drive is “empty”. Click it.

Select the first option in the pop-up menu, “Choose/Create a disk image…”

Select “Add”

Find the Linux Mint OS download and select it. Then click “open” and then “choose” to move on.

You’ll see now there is an imaginary “CD” loaded into the imaginary “optical drive”. We can now start the machine. Click the green “Start” arrow.

The OS opens in a tiny little window which is annoying. If you select “Start Linux Mint”, the OS will run but none of your settings or files will be saved. We need to “install” the OS by selecting “OEM install (for manufacturers)”, and also go to the “view” menu and select “scaled mode”. (OEM stands for Original Equipment Manufacturer).


An installation GUI will start. Follow the prompts.


When you get here, click the password field and choose a password. Don’t worry that you can’t choose the other details. The OEM version will be deleted later.

Once it loads up, double click the icon on the desktop to finalise the OEM installation. The next run will be for a brand new user to set up the OS for themselves.

Now restart the machine. If you are asked to remove the installation media and hit <enter>, just hit <enter> the installation media is automatically removed by VirtualBox.
Then restart by clicking the start arrow in VirtualBox
Set a new password and you’ll be in. Congratulations, you are now running Linux Mint on your Windows computer! There’s more to do…
Install VirtualBox Extensions.
Find out the exact version of VirtualBox you are running.
Then go to the VirtualBox website and to the download section. Scroll down a bit and find this…

The extension pack version needs to match your program version.
Click the “all supported platforms” link, download it, check the signature if you are inclined, and double-click the file to install.
Run updates on Linux.
Log in to Linux Mint, open the terminal and type:
sudo apt-get update
That might take several minutes. Then type:
sudo apt-get upgrade
Install Bitcoin Core
Load up Firefox, the pre-installed web browser and navigate to bitcoin.org
Bitcoin core is hidden in the resources menu, at the bottom. Click it. Then click the big Download Bitcoin Core button.
This is gonna feel weird on a Windows computer, but select the Linux (TGZ) file on the left, and save the file to your computer. It should automatically go to the downloads directory which is perfect.
Verify Releases – See this guide and follow instructions in the headings <verify the download part 1> and <… part 2>
Open the directory and right-click the newly-downloaded file to “extract here…”

I prefer to delete the installation files and move the extracted folder to the desktop, and I like to rename it to “bitcoin”
Next, open the terminal and type the following to run Bitcoin Core (navigate first to the ‘bin’ directory, then type the command starting with a “.”)


This confirms it loads. But we can’t proceed yet. We haven’t set up the hard drive. That is next. Click Cancel.
Prepare the external hard drive
Sometimes drives may plug and play. On a Windows machine running VirtualBox, no such luck. There’s work to do. I struggled for a long time figuring this out so read carefully and don’t suffer as I did.
Plug in the drive. It’s just not going to work.
With the machine off, click the settings button, then USB on the left panel (see image below). Then on the right panel, click the second button, the one with the plus sign. You should see your drive there. select it. It should appear in the “USB Device Filters” centre window.
Also, in the top section, change the USB controller to USB 3.0 (USB 1.1 and 2.0 will still work of course)

It didn’t work for a while for me, because I was playing around with other things trying to figure out the problem. I had unselected “device filters”, and forgot. Make sure in the main VirtualBox window, where all the devices are listed, that if you right-click USB, the controller and Device Filters are BOTH checked, unlike what is shown below.

Now power up the virtual machine. The drive should be on the desktop.
Next, we are going to partition it and format it.
Here is a web page showing good instructions and sufficient detail if you want to learn about how to do it. There are other resources available. Unfortunately, it’s harder than it has to be.
You can either read and follow the advice on that link, or follow along here. Pay attention to detail.
Using fdisk, we will delete existing partitions, create one new partition, and format it to ext4. Then log out and log back in. It should auto-mount.
In terminal, type sudo fdisk -l to find the name of the drive.
External hard drives are likely to be /dev/sda or /dev/sdb etc.
These are Linux files describing the drives you have attached.
I can tell from the size column that my drive is /dev/sdb. Under “device” there is /dev/sdb1. This is an existing partition on my drive.
I’m going to delete the partition, create a new Linux partition, and format to the ext4 filesystem.
Unmount
But first, my drive (which has been mounted automatically), needs to be unmounted.
The easiest way is with the graphical user interface, in the typical way you would eject a drive.
The hacker way is to use the command-line, “umount”. NOT “unmoun” – be careful of the spelling.
sudo umount /media/parman/BitcoinDRV
OR
sudo umount /dev/sdb1
(parman is the username I chose. BitcoinDRV was the label I gave the drive when I previously formatted it on another computer.)
What is mounting? Linux has a root file system that starts at / and in this case, is located on the SD Card. Any drive you attach gets attached to this file system, which is what “mounting” refers to. Without mounting the drive, there is no access to the files. The mount point on the SD card file system eg /media/YourUserName becomes the “root” directory of the attached drive.
Now we use fdisk:
If the drive is still mounted this won’t work.
Type sudo fdisk /dev/sdb. Typing m shows you the options. Do that. Try i and see the partition printout, just for interest. Then type m when prompted to go back to the menu.
Next type d — to delete partitions. Then do it again if there are other partitions.
Now type g — it will create a new empty GPT partition table.
Now type n— to create a new partition. Keep hitting <enter> and accept the defaults. This will use all the space and create one partition.
Lastly, in fdisk, type w to actually write these changes to disk.
Format
The drive still needs to be formatted.
Type:
sudo mkfs.ext4 /dev/sdb1
I suppose mkfs stands for “make file system”
Next, remove the drive and plug it in, it should auto-mount, and you’ll see it on your desktop. You may need to reboot.
Mounted location
When you’re logged back in, you’ll see the drive on the desktop. It has been automatically mounted.
You’ll see a drive icon on the desktop. That’s an illusion. The drive is not actually mounted to the desktop (ie not /home/YourUserName/Desktop/UntitledDrive). We need to find the mount point and actual name of the drive, not the label the GUI gives us. Open terminal, navigate to /media/YourUserName/, and type ls . You’ll probably find your drive there.
My output was 6c5037ab-1a10-4f5c-9518-25a71a7a8d57 which is the name of the drive, the UUID, universally unique identifier, and it’s quite ridiculous to use as a directory name. I wanted to change it to something manageable. I explored for a couple of hours and tried different things. It was fine until I came to the obstacle of making Linux auto-mount the drive to exactly the same location and drive name each time. I had to edit a dangerous-to-edit file which froze my system and I had to re-flash the SD card and start over. I think it’s safer to recommend to you to just stick to this ugly directory name.
Change permission of drive. THIS IS CRUCIAL.
The drive partition just create (located in /media/YourUserName) has root permissions not YourUserName permissions. We need to give it YourUserName permissions, otherwise we can’t access it when logged in as YourUserName
Type :
sudo chown YourUserName: /media/YourUserName/6c5037ab-1a10-4f5c-9518-25a71a7a8d57

PRO TIP - NAVIGATE TO THE DRIVE LOCATION, THEN AS YOU TYPE THE COMMAND ABOVE JUST TYPE THE FIRST CHARARCTER AND THEN HIT <TAB> - IT WILL AUTO COMPLETE.
— of course type in your drive’s UUID, not mine.
Now you have a working Linux OS on your Windows computer, with an external drive, ready to run Bitcoin Core.
Run Bitcoin Core for the first time
Open terminal
Navigate to the bitcoin/bin directory, and type ./bitcoin-qt.

This will pop up:

Select “use a custom data directory”, find your drive and select it. Then click OK. I am electing to prune the blockchain and only keep 2Gy, mainly out of interest as I already have several nodes running. I have connected a 32Gb Pen drive, and it will be interesting to see if this will suffice to run a node. If you have attached a large SSD, make sure you uncheck this box before proceeding. I later decided to abandon this idea, as it would limit the addresses and transactions I could look up.
Next, hide the synchronisation window, go to the menu settings… options. Click on Open configuration file.

add the line to the empty document: server=1
If you’d like to be able to look up any transaction, not just the ones from your wallet, add the line txindex=1 (HOWEVER, THIS IS NOT COMPATIBLE WITH PRUNE MODE. DO THIS ONLY IF YOU ARE USING A LARGE HARD DRIVE)
Then shutdown and restart Bitcoin core.
At some point, you will have the option to create a new wallet. Do that, but remember, do not encrypt the wallet. Also, don’t use this wallet for any funds – it’s a hot wallet and that’s not safe. Your bitcoin should be stored offline.
Download Electrum Personal Server
You can do this while the Bitcoin blockchain is downloading.
Go to the GitHub release page. Link

There are two files you need to download. The source code (don’t worry, we aren’t compiling) and the signature.
Download one of the source codes (either the .zip compression or the .tar.gz compression). Also, download the corresponding .asc file. Eg, download SourceCode.zip and eps-v0.2.1.1.zip.asc .
Next, download Chris Belcher’s public key; there is a link on the page, and it’s also here: Link
Click raw and then save the data to your computer. Note its location. Open the terminal, and navigate to the location of the public key.
Type
gpg --import NameOfPublicKey
In Linux/Mac, the double dash precedes options for commands that are longer than one letter. A single dash means that if more than one letter follows, each letter is an individual option. Eg -abcd is four separate options, --abcdis one option that’s called “abcd”.
With the above command, Chris’s public key should be now stored on your computer.
Next, in the terminal, navigate to where the source code and signature file is. Type
gpg --verify NameOfSignatureFile NameOfZipFile
Note the space between the two file names, and, the order matters. The signature file must be first.
If the signature file and the zip file only differed by an .asc at the end of the signature file (eg abcdefg.zip & abcdefg.zip.asc), then in the gpg command you don’t need to type NameOfZipFile. Gpg will know what you want.
The output should say something like this:
gpg: assuming signed data in ‘eps-v0.2.1.1.zip’gpg: Signature made Tue 9 Jun 23:30:42 2020 AESTgpg: using RSA key EF734EA677F31129gpg: Good signature from “Chris Belcher <false@email.com>” [unknown]gpg: WARNING: This key is not certified with a trusted signature!gpg: There is no indication that the signature belongs to the owner.Primary key fingerprint: 0A8B 038F 5E10 CC27 89BF CFFF EF73 4EA6 77F3 1129
The Good signature from is the crucial part. The warning is not relevant; safe to ignore.
Next, unzip the source code and put the directory where you want it. I put it on the Desktop. Then rename it to something easy to type, eg eps.
Install or update PIP
PIP is a command-line program that helps you to install Python packages on your system. It does not come with Linux Mint, but does with other distributions of Linux. If you are following the guide exactly, install pip with this command:
sudo apt install python3-pip
If you already have pip installed, update it like this:
sudo pip3 install --upgrade pip
Install Electrum Personal Server
Next is the bit that I seriously tripped up on, and I want it to go smoothly for you.
Make sure you have the latest version of pip. Type this in the terminal:
sudo pip3 install --upgrade pip
Navigate in terminal to the unzipped directory which you wisely placed on the Desktop and renamed ~/Desktop/eps/. Inside, there should be several files (and directories) including a file called setup.cfg.
Within this directory, type
pip3 install --user . (<——- Notice the dot!)
Pay attention… there is a . after user. I have tripped up, trying on various operating systems and computers, and always failed at this point, until I realised I wasn’t typing that pesky .
Also, note user is typed as is, it’s not your username. Don’t replace bit with YourUserName.
Also note, that I accidentally typed the command with sudo at the start due to habit. It installed EPS as the root which is not what we want. We want to install it to YourUserName.
After this command, EPS should be installed. You should see an output that ends in something similar to
Successfully installed electrum-personal-server-0.2.0.dev0
The output also may tell you
The script electrum-personal-server is installed in ‘/home/YourUserName/.local/bin’ which is not on PATH. Consider adding this directory to PATH or, if you prefer to suppress this warning, use — no-warn-script-location
PATH is a special variable that contains all the directories that are in the “memory” so when in the terminal, you can access files in these directories without navigating to them.
Don’t worry about this warning. Log out, and log in, and it will be added to the PATH automatically anyway.
Don’t run EPS yet
Before running EPS, you should:
- Wait for Bitcoin Core to fully synchronise
- Have Electrum Wallet setup up.
- Have ready a public key (xpub, ypub, or zpub), or multiple public keys (Xpub’s Ypub’s or Zpub’s) for a multisignature wallet.
Set up an Electrum Wallet
To set up an Electrum Wallet, you can find my instructions in the article, “How to set up a Raspberry Pi Zero (air-gapped) running the latest version of Electrum Desktop Wallet”, under the heading “Running a virtual machine” Link.
Here is a skeleton of the instructions:
- Go to electrum.org and download the Python
*.tar.gzfile and thesignature. Also, download and import ThomasV’s public key to your key ring. - Verify the download
- Install dependencies (copy the command next to “Install dependencies” on the website, and run in the terminal). Use copy and paste. As of version 4.0.3 the command is:
sudo apt-get install python3-pyqt5 libsecp256k1-0 python3-cryptography
- Install Electrum (The instructions in my linked article skipped this and just ran Electrum without installing. You can do this too or, install it as follows: First navigate to where the .tar.gz the downloaded file is, usually the Downloads directory. Don’t unzip it. From there, in the terminal, type:
python3 -m pip install --user ElectrumFileName.tar.gz
Because of upgrades, the ElectrumFileName will regularly change, just type out what you’ve downloaded. By installing Electrum, it’s a bit easier to run it. You can just type electrum , case sensitive, from any directory in the terminal and it runs. You never need to unzip the file, and it can be deleted even.
Gather your public keys
Copy your public keys from your Electrum wallet, or your hardware wallet(s) and keep them handy in a text file on your desktop.
In your Electrum Wallet, go to the menu wallet and information and you’ll see this…

This is a multisignature wallet with five Zpubs. You can select each one and copy the text that appears below as needed. If you have a single signature wallet, you’ll see just one “keystore”.
Edit EPS config file
Go to the unzipped eps directory again and rename the file config.ini_sample to config.ini
The config file needs to be edited properly for the program to work.
Open this text file and begin editing as I will explain. Note, anything that starts with a # is just a comment and will be ignored by EPS. Also note that for some lines, it may appear not to start with a #, but in fact, it might just be wrapped around the line above that didn’t fit in the narrow window.
This is a screenshot of part of the config.ini file:

Notice (it’s hard to see at first glance) that the config file is divided up by headings in square brackets. EPS looks for specific instructions under these headings.
Also, notice the line that says #multisig wallet = 2 followed by three lines of xpubs. This is an example of text wrapping around that is all actually on one line.
[master public keys]
Under this first heading, add your public keys that you’ll find in Electrum Wallet. I couldn’t get EPS running without first doing this.
For a multisig wallet, for example, a 3 of 5 wallet, in the EPS config.ini file, add (all in one line, separating each Zpub with a space) :
AnyNameForYourWallet = 3 Zpub1 Zpub2 Zpub3 Zpub4 Zpub5
The number after the equals sign indicates the minimum number of private keys to spend from the wallet, and the number of Zpubs you list defines the number of public keys in the wallet.
This is just like the example given in the config file, except, don’t type a # at the start.
For a single signature wallet, it’s much easier, under the same heading in the config.ini file, add the line
AnyNameForWallet2 = zPub
— or use an xPub or yPub
[bitcoin-rpc]
This is the next heading in the config.ini file. Your Bitcoin Core Node will be running on the same computer as your EPS (I do recommend this, because I have not yet succeeded in running EPS and Bitcoin Core on different computers while talking to each other), so leave this address as-is:
host = 127.0.0.1
port = 8332
The IP address 127.0.0.1 is code for “this computer” and is universal.
If your EPS really needs to connect to a Bitcoin Core on a different computer on the same home network, then you add the bitcoin core computer’s IP address. I believe you also need to add a line in the Bitcoin Core config file, rpcallow=ip_address_of_EPS_computer. I haven’t tried hard enough to make this work, so I have no tested instructions for you. It might not even be developed for that, and so it may not be possible yet. If you want to try it yourself, don’t let me stop you.
The next part is a bit tricky and non-intuitive:
Note the following lines in the config.ini file:
#add the bitcoin datadir to search for the .cookie file created by the
# node, which avoids the need to configure rpc_user/pass
#leave this option empty to have it look in the default location
datadir =
#if you dont want to use the .cookie method with datadir, uncomment to config u/p here
#rpc_user =
#rpc_password =
Basically, you have a choice
- uncomment the
datadir=line
OR
2. uncomment the rpc_user= and rpc_password= lines.
The default is using the datadir= line and commenting out the 2nd option. Do this.
If during your bitcoin installation, you didn’t move the data directory (where the blockchain is stored), you can leave the line datadir= as is, BUT, we did. We moved it to the external hard drive. So you need to enter the path to the mount point of your drive after datadir= Here we need to use that long UUID. This is what I put:
datadir=/media/YourUserName/6c5037ab-1a10-4f5c-9518-25a71a7a8d57
Notice this is a directory where .cookie will be found. You shouldn’t actually enter the file as well, just the directory.
Bitcoin Core’s config file starts empty, however, if you have been playing around with Bitcoin Core prior to this, you may have these lines (below) already in there:
rpcuser=UserNameOfYourChoice
and
rpcpassword=PasswordOfYourChoice
If these lines exist in bitcoin.conf, Bitcoin Core does not create a .cookie file. Electrum Personal Server will look for that file, and because it doesn’t exist, it will create an error. This pesky trap blocked me from getting this project done for months. I eventually found this solution from an obscure online forum post in the depths of internet history, among many many non-solutions. Comment out these lines with a # or delete them, and it will create the elusive .cookie file.
An alternative is to comment out the datadir= line in EPS config.ini, add include
rpc_user=UserNameOfYourChoice
and
rpc_password=PasswordOfYourChoice
to that file, and only THEN, you can leave rpcuser and rpcpassword in the bitcoin.conf file. During my many weeks of failure, this option still created an error though. Theoretically, it should work. Many people posted this issue in forums, and the solution was to go with the datadir= option. Which didn’t work for me because of the missing .cookie file.
Just in case you want to know:
How to find where the DEFAULT data directory for Bitcoin Core is?
On a Mac, the default location is: ~/Library/Application\ Support/Bitcoin/ (Note: the “\” is an escape character, telling the OS that the following space is part of the directory name)
For Linux, it’s a hidden file. Located here ~/.bitcoin/. To navigate there, you type cd ~ and then cd .bitcoin — you must type that . Before bitcoin which indicates the directory is hidden.
In the EPS config file, you’d enter datadir = ~/.bitcoin or leave it blank after = because that’s the default anyway.
[watch-only-addresses]
You have to enter at least an address or a public key in the appropriate location of the config file for EPS to run.
If you are not ready with your public keys, you can enter one of your (or anyone else’s) random Bitcoin address here, just to get EPS working.
A_Name = bc1qGivEmE6poINt15BitcOINplez
Other config.ini headings
There are other headings, but this is basically all you need to do. The rest of the config.ini file you can read, and probably leave as-is, unless you find a good reason to change something.
Run Electrum Personal Server
Once the EPS config file is edited, and once Bitcoin Core is fully synchronised, and also running, we can run Electrum Personal Server. Do remember Bitcoin Core needs to be running.
If by some chance the directory ~/.local/bin is not in our PATH, then you manually have to type the file electrum-personal-server’s exact location.
There are ways to add it so it’s always there, but if you edit the .profile file incorrectly, you can damage your installation and have to reflash the SD card and start over — or so I’m told Safest is to type the location manually in the command ~/.local/bin/electrum-personal-server
Go to the eps directory cd ~/Desktop/eps/, while Bitcoin Core is running, and type
electrum-personal-server config.ini
This command is just 2 filenames separated by a space.
If you are not in the directory where config.ini is, you have to type its full path in the command. If electrum-personal-server file is not in your PATH you need to type its full path as well. OR just move the file and put it in the same directory as the config.ini file
Once you run this for the first time, you’ll get a message about re-scanning, and it will exit. This is normal. It says:
If recovering a wallet that already has existing transactions, then run the rescan script. If you’re confident that the wallets are new and empty then there’s no need to rescan, just restart this script
EPS does some magic I don’t understand, but I think of it as having its own address list to look for. It needs to be told how far back in the blockchain to look. For this, it needs to scan the blockchain. You only need to scan as far back as your first bitcoin UTXO was received in the wallet you are going to watch, but I would scan the whole blockchain to remain maximally flexible. It takes a bit longer of course. This is how to do it:
Navigate to your EPS directory. Make sure Bitcoin Core is running, and from there, type
./electrum-personal-server --rescan config.ini
It will ask for the earliest wallet creation date. Enter 1 to start from block height 1, and y to confirm.
Now, wait a while, possibly a day or two.
Once it is done, run EPS again, electrum-personal-server config.ini
Connect your Electrum Desktop Wallet
When you run Electrum Desktop Wallet for the first time, and load your real addresses or public keys, be disconnected from the internet so you don’t accidentally leak private information before you have the settings sorted out correctly. It’s difficult to get the settings right without first running Electrum. So here are the steps:
- Stop Bitcoin Core. Stop EPS. Disconnect the internet (double check by failing to load a webpage)
- If Electrum is installed, you can type
electrumfrom any directory in the terminal, case sensitive. If it is not installed, go to where you unzipped the electrum download and from within that directory, type./run_electrum - Choose
Select server manually

4. Make sure Select server automatically is not ticked, and type in your local host with port 50002 (it’s always 127.0.0.1:50002), then click Next .

5. Proceed to making or loading up a wallet, or a watching address. Whichever you choose, make sure it is the same as what you entered in Electrum Personal Server’s config.ini file.
6. Go to the menu Tools then Preference, then change the Base unit from mBTC to BTC, then shut down Electrum.
7. In terminal type cd ~/.electrum (this directory is only created once Electrum is run for the first time)
8. Type nano config and make some changes as follows: auto_connect should be false. check_updates should be false. onserver is false, but change it to true — this is really important to prevent your server from leaking private information. server should be 127.0.0.1:50002:s
9. Connect to the internet. Make sure Bitcoin Core is running. Make sure EPS is running.
10. Load Electrum Wallet. It should be working and showing your balance, verified by your own Node!
Troubleshooting:
Make sure you have only one wallet open at a time.
Make sure any wallet you open is also specified in the config.ini file of EPS.
Make sure Bitcoin Core is fully synced and running.
Make sure EPS is running.
If you created a wallet with Bitcoin Core and encrypted it, I have no idea why, but EPS fails. The solution is to back up your wallet, and remove it or delete it from the data directory. Then restart Bitcoin Core and create a new wallet. This time, don’t encrypt it.
Tips:
Static Lightning Address: dandysack84@walletofsatoshi.com
On-chain or Lightning